 Yusral
Handle a case
Reply to a customer, leave notes for your colleagues and keep the case up to date.
A case brings together everything about one customer request. On the left, you read and write. On the right are the case's details.
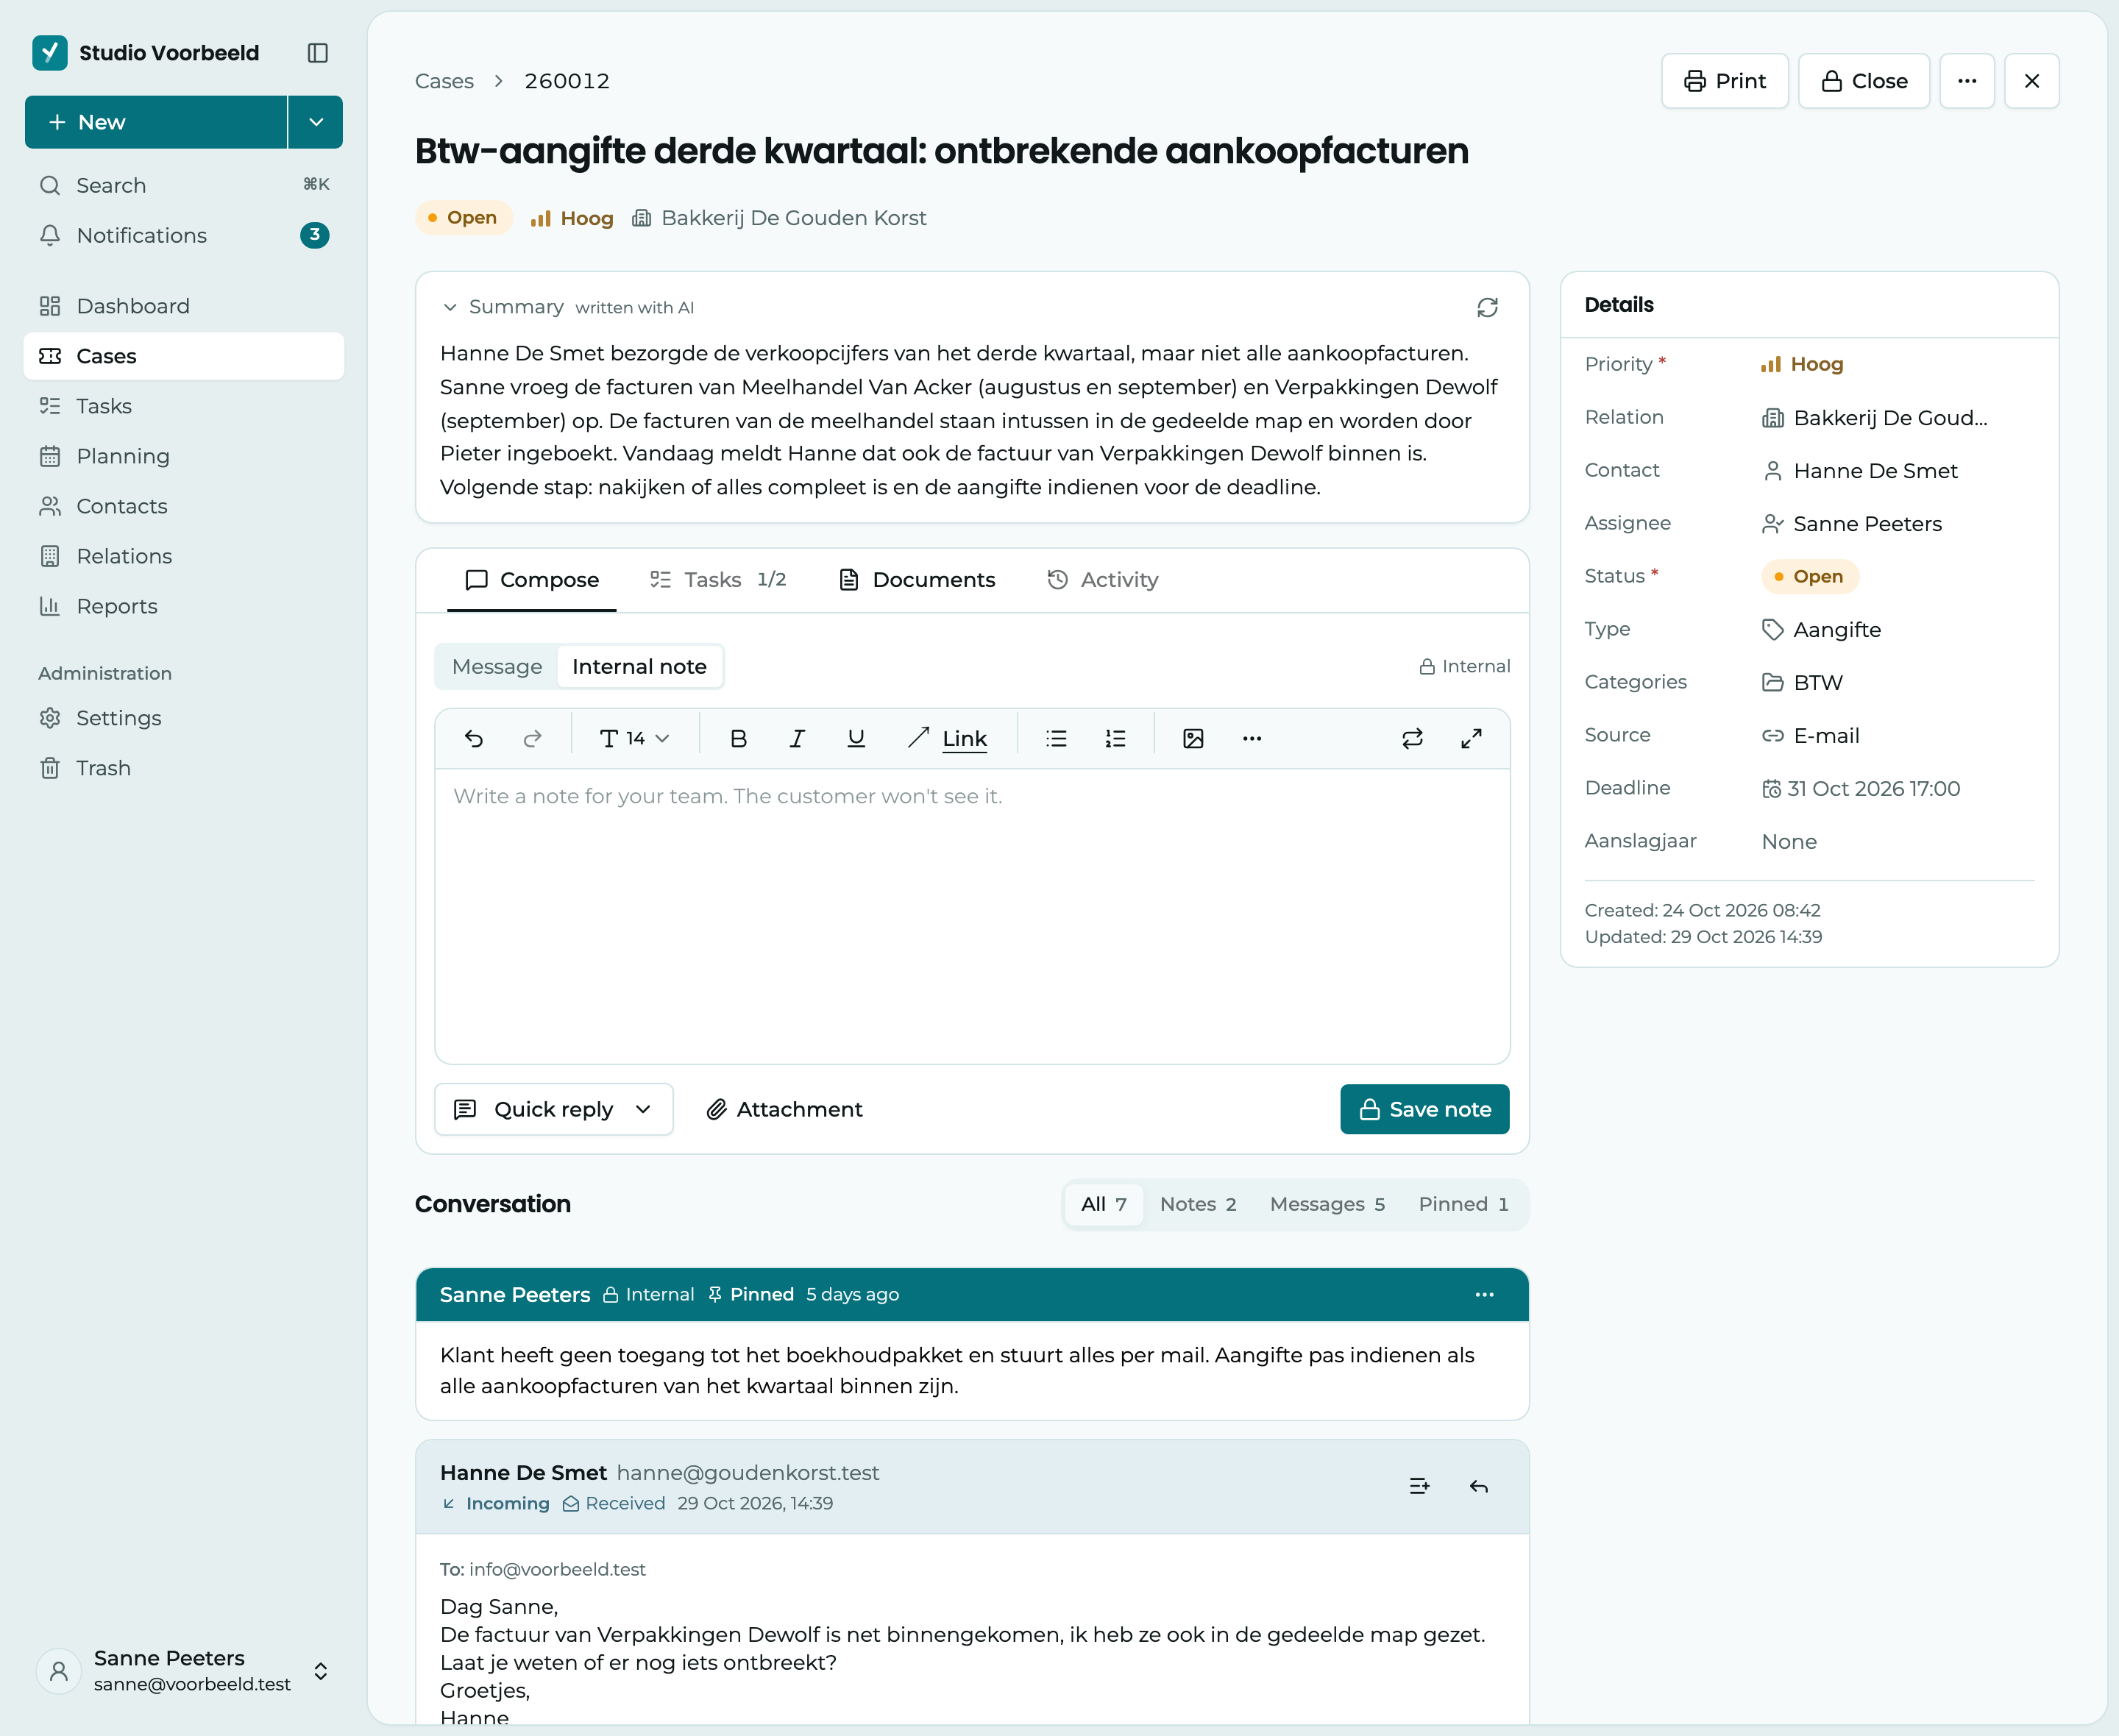
1 The header. The subject is the page title. Hover over it and click the pencil to change it. Below it, you see the status, the priority and the relation straight away. On the right are Print, Close (gives the case the status for closed cases) and More options, which holds Delete.
2 Compose, Tasks, Documents and Activity. One card with four tabs. Under Compose, you write to the customer or to your colleagues. Next to Tasks and Documents is how many there are. Activity shows who changed what.
3 The conversation. Under Conversation are all the emails with the customer and all your team's notes, newest first. Filter on Notes, Messages or Pinned when the case gets long, or choose All for the whole history.
4 The details. Priority, relation, contact, assignee, status, type, category, source, deadline and your organisation's custom fields. At the bottom, you see when the case was created and last updated.
Sometimes there is also a Summary of the case at the top, if the AI assistant is on. The conversation refreshes itself every minute, so a new email from the customer appears by itself.
Change the details
In Details, click a value. A small window opens next to it so you can change it:
- With a picklist, such as status, assignee or relation, you search for the right value and click it. It is saved straight away.
- With a text or number field, you type the new value and click Save, or press Enter.
- With a date, such as the deadline, your choice is saved straight away. Clear removes it.
Esc or a click outside leaves the value as it was. The relation and the contact are links to their own page. To choose a different one, click the arrow next to it. You pick a contact from the people of the chosen relation.
Write a note or reply to the customer
Above the text box under Compose, you choose who reads your text. The text box always opens on Internal note, because most of what you write in a case is for your team.
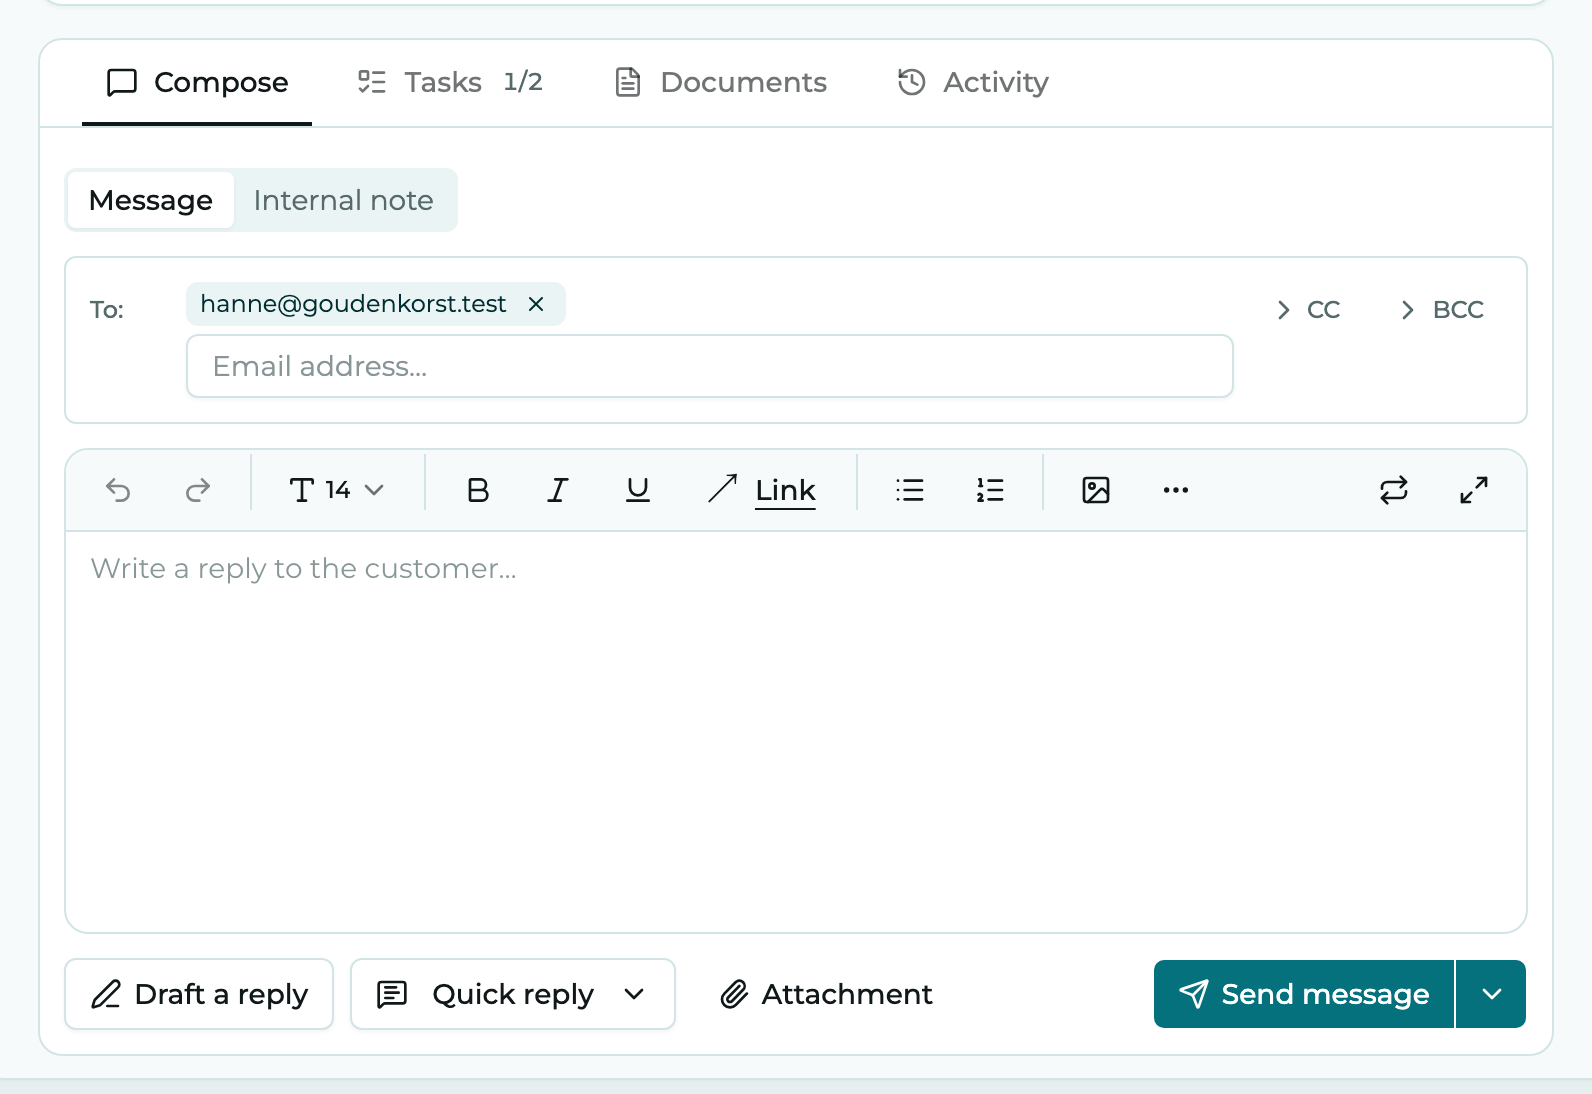
1 Message or Internal note. Here you choose whether the text goes to the customer or stays with your team.
2 To: The recipients of your message. This field only appears with Message.
3 Send message. Sends your message. With an internal note, this says Save note.
| Choose | Button | What happens | Who sees it |
|---|---|---|---|
| Internal note | Save note | Saves the text in the conversation as an internal note. | Only your colleagues |
| Message | Send message | Sends the text as an email to the recipients in To:. | The customer, and your colleagues in the conversation |
You can also switch quickly with the keyboard: press R for a message to the customer and N for an internal note. The cursor is then straight in the text box.
Check who is in To:
A note never leaves Yusral. A message does: it goes out straight away as an email to everyone in To:, CC and BCC.
Choose Message
Click Message above the text box. To reply to a particular email, click Reply on that email. The text box switches to Message, with the sender in To: and the other recipients of that email in CC.
Choose the recipients
To: already holds the case's contact, or otherwise the address you last emailed. Type another address to add someone. Click CC or BCC to open those fields.
Write your text
Type in Write a reply to the customer…. With Quick reply, you choose a standard text your organisation has prepared. You can still change it afterwards. If the AI assistant is on, Suggest a reply writes a first version for you, see AI assistant.
Add attachments (optional)
Click Attachment. You can send up to 20 files, each up to 25 MB.
Send
Click Send message. For an internal note, choose Internal note and click Save note.
If you go to another page for a moment before sending, your text stays put as long as your tab is open.
Formatting and pasting from Outlook
The toolbar above the text box has the usual formatting, such as bold, lists, links and images, and Clear formatting. When you select text, a small menu with bold, italic, underline and a link also appears.
An Enter puts the next line directly below, as in an email program. That way, your email reaches the customer the way you typed it.
If you paste text from Outlook or Word, bold, links and lists are kept. Colours and font sizes are dropped, so your email stays in one style. Images from an Outlook email can't come along. If you see Pasted images couldn't come along and were left out, add them with the image button.
More send options
The arrow next to Send message opens the Send options.
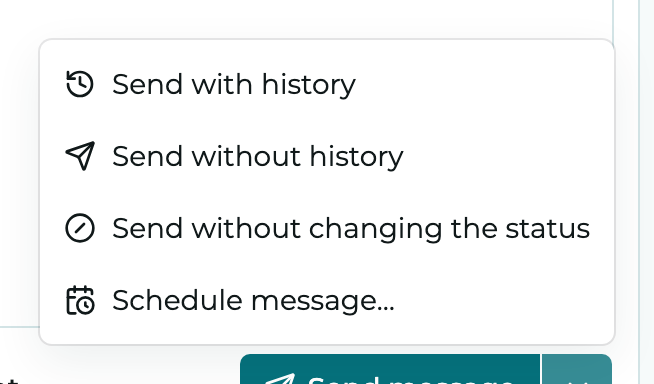
- Send with history puts the earlier emails below your message, like an ordinary reply in your email program.
- Send without history only sends your new text.
- Send without changing the status leaves the case's status alone. Normally, Yusral changes the status after sending, according to the Automatic statuses your administrator has set up.
- Schedule message… sends the message later. See below.
Your administrator chooses which of the first two is the default under Settings, with Send with the conversation history by default.
Send a message later
Choose Schedule message… in the send options. In the Schedule message window, fill in a Date and Time, choose whether to Include the conversation history, and click Schedule. The message appears in the conversation with the Scheduled label and goes out at the chosen moment.
Until then, you can still Edit or Cancel it. A cancelled message stays in the conversation with the Cancelled label, so your colleagues see what was not sent. You can then still Reschedule or delete it.
What the conversation shows
Between the emails and notes are short lines for what changed on the case, such as a different status, assignee, priority or deadline. If someone changes several fields shortly after each other, that appears on one line.
- The bottom line says how the case started: Opened by a colleague, or Came in by email from the customer.
- If a closed case opens again, for example because of a new note or task, it says Reopened, with who did it.
Bring in a colleague
Type @ in a note and choose a name. That colleague gets a notification and can jump straight into the case. With @Everyone, your whole organisation gets a notification, if your role allows it.
You put important notes at the top: choose Pin in the note's menu. A pinned note gets a dark bar at the top and stays at the top of the conversation, and under Pinned, however long the case gets. Unpin takes it off again.
Want to show that you have read a message or note, or that you agree with it? Hover over it and click Add reaction at the top. Reactions appear below the text, visible to everyone.
You change your own note through Edit in the menu. It then gets the (edited) label.
Deleting a note can't be undone. It doesn't go to the trash.
Tasks and documents on the case
Next to Compose are the Tasks and Documents tabs.
- Under Tasks, you use Task to create work that belongs to this case, with an assignee and a deadline. Those tasks also appear in the Tasks list. Drag a task to change the order, and hide finished tasks with Hide completed. If the AI assistant is on, you can also click Draft a task on an email from the customer, see AI assistant.
- Under Documents are the case's files, including the attachments from messages and notes. Drag files in or click Upload, up to 10 at a time and each up to 25 MB. Deleting a document is permanent.
Who changed what
Under Activity is every change to the case, with who made it and when. This tab is part of the Professional subscription, and you only see it if your role allows it (by default the owner, admins and managers).
Print a case or save it as a PDF
Click Print at the top and choose which version you want:
- Public: for the customer. The messages, without internal notes.
- Internal: for your own records. Also the internal notes and the activity.
Then click Print. The A4 PDF is downloaded and also opens in a new tab, so you can print it straight away. If your browser blocks new tabs, you only get the download.
Printing is part of the Professional subscription, and you only see the button if your role allows it (by default the owner, admins and managers).
Delete a case
Through More options at the top, choose Delete. The case goes to the Trash, together with its messages and notes. As long as it is there, it can be restored by anyone with access to the trash (by default the owner, admins and managers).
If you later open a link to a deleted case, you see that it is in the trash, with Restore if you are allowed to. If it was merged, you see which case it was merged into, and a button to go there.